Using the iPhone Calendar App

Using the iPhone Calendar App
The iPhone Calendar App allows you to keep a calendar in your pocket or handbag. But beyond a basic calendar, consider these other benefits:
- It can alert you prior to events.
- You can create recurring meetings.
- You can invite people to events.
- You can have multiple calendar views like day at a glance, week at a glance and more.
Additionally, there are many advanced calendar topics that require actions in the Settings app. These are beyond the scope of this recipe. These benefits include:
- You can keep multiple calendars, e.g. one for work, one for family and other personal calendars.
- It will sync calendars with Google, Outlook, iCloud and more. Even multiple services.
This Senior Tech Recipe will focus on the two core tasks of working with the Calendar App:
- Viewing your Calendar
- Creating Calendar events.
Viewing your Calendar
The Calendar app provides a variety of view options to see your daily, weekly calendars and lists of events. An active user will certainly develop their own approach to viewing and maintaining their calendars. Here is an initial path to follow:
Launch the Calendar App by tapping its icon on the Home screen.
![]()
Tap Today on the bottom left on the screen.
Choose to view calendar in Daily or List view by tapping the List icon on the upper of the screen.

- The List View presents a list of events from multiple days. Swipe up and down to move to future events. Tap an event to see details. Tap Edit to modify the event.
- The Daily View presents a detailed daily calendar. Use the weekly calendar at the top to change days. Tap an event to see details.
Other Views
The Calendar app provides monthly and yearly reference calendars as an easy way to move forward and backward in time. 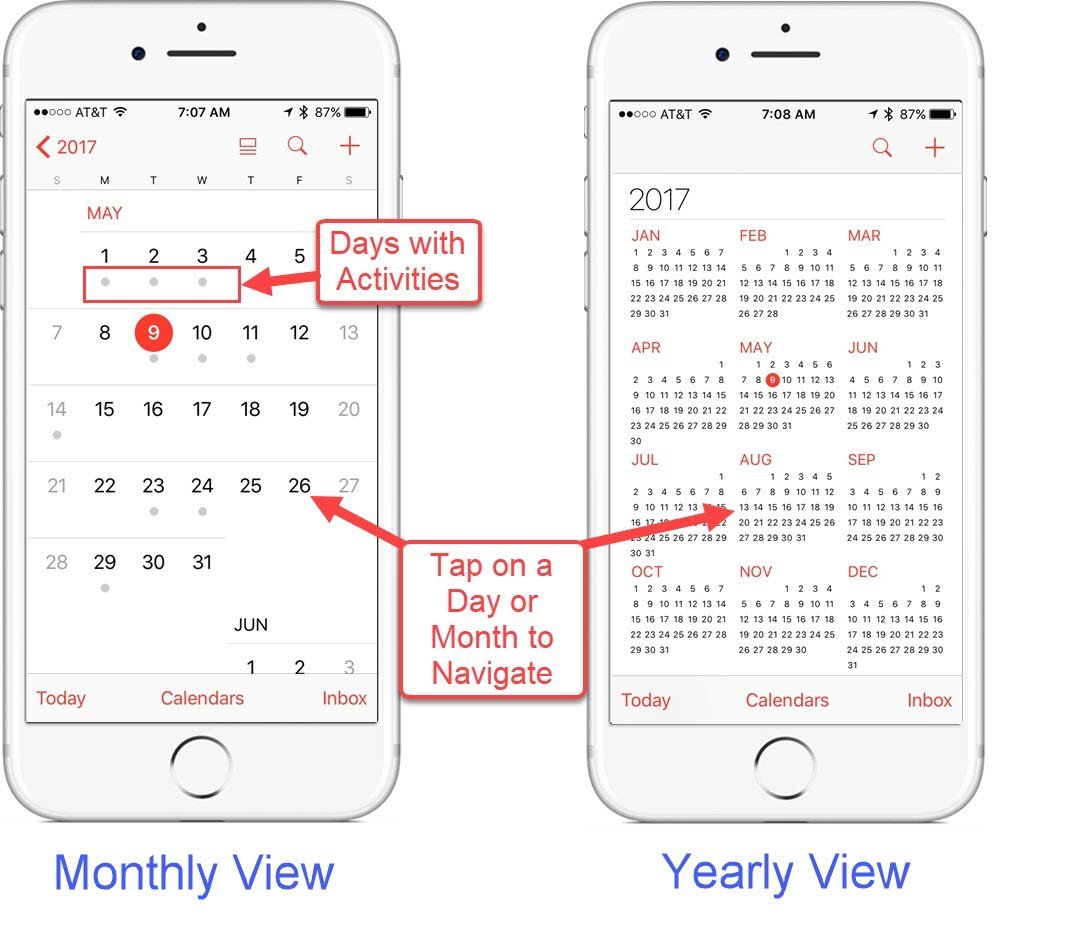
Monthly Calendar: From a Daily or List View, tap the name of the month on the upper left of the calendar screen to get a monthly view. Specific events are not displayed but days with events have a dot below the day. Tap on a day to see the daily detail.
Yearly Calendar: Tap the year on the upper left of the monthly view to get a full year of dates. Specific events are not displayed but the display is useful for navigation. Tap a month to display a monthly view. From the Monthly View, tap on any day to see the daily detail.
Week-at-a-Glance: A week-at-a-glance calendar is available from the monthly or yearly calendars by tipping your iPhone to landscape mode.
 With the Week-at-a-Glance calendar you can:
- Swipe to move the calendar to other days and times.
- Add an event from this view by pressing and holding at the date-time of the event that you wish to add.
- Return from the week-at-a-glance view by moving back to portrait mode.
The Calendar app provides List, Daily, Week at a Glance, Monthly and Yearly views to meet your calendar needs for both navigating your calendar and viewing your activities. The right view for your activities is a personal choice for you.
Create an Event
How to create an event on your iPhone calendar
Adding an event to the calendar can be simple or can include functions like alerts, repeating events and other invitees. Take this tour of the event creation process and choose your approach based on your needs:
- Tap Calendar on your iPhone home screen.
- Tap on the + (plus sign) in the upper right hand corner. You can also add an event by pressing on a date-time on your Daily View calendar.
3 Enter a Title that will appear on your calendar.
4 Indicating a Location for the event is optional or can be very specific to include an address. If you start to type, the app will use recent locations, locations from the Maps app and locations from your Contacts app as suggestions.
5 Indicate if you want the event to be an all day event. Green is on. All day works great to record events like birthdays or anniversaries or vacation days that are not scheduled for a specific time. If all day is turned off, you can choose a specific start and end date and time.
6 Starts & Ends – Use the date – time picker by swiping up or down to change the date, minutes and AM/PM indicate for the time you want the event to start and end.
7 Tap Repeat if you wish to schedule a recurring event. This is perfect if you are recording a birthday where you can schedule multiple yearly events so that it remains on your calendar indefinitely. If you indicate a Repeat preference, use End Repeat to indicate Never end or pick a date.
8 Tap Invitees to add additional people to the event. This will send an invitation to the email of the invitee.
9> Next choose an alert if you’d like to be notified of an event.
Tap Alert.
Choose when you’d like to be alerted. Alerts will be presented on your iPhone screen as a banner or notification.
If you choose an Alert, you can then tap Second Alert if you wish to define a second alerts.
10 Notes – Add any notes that you would like to keep about the meeting or event. This could be agenda items, location details and more.

Using Siri to Create and View Events
Like many of the built-in iPhone apps, you can use Siri to quickly add events to your calendar. Here is some basic commands:
Engage Siri by holding the Home button or saying “Hey Siri” and speaking a command like:
- “Schedule Coffee for tomorrow at 9 AM.”
- “Schedule Meeting with John Smith on September 9, 2019 at 2 PM.”
Siri will schedule the event and send invitations to other invitees.
You can also use Siri to access events on your calendar.
Summon Siri and ask:
- “What’s on my calendar?”
- “What’s on my calendar today?”
- “What’s on my calendar this week?”
- “When is my appointment with Mark?”
Additional Information
The Senior Tech Club recommends the following additional resources for members that wish to pursue additional and/or advanced information on this recipe:
iPhone User Guide – Calendar App
Senior Tech Club Recipes and Nuggets to help you stay organized
.





0 Comments