Scan and Store Documents Using your iPhone’s Notes App
Ever wish you had access to a scanner that you could use to scan and store documents? With your iPhone, you have a document scanner that you hold in your hand. There are a number of uses:
- If you have received instruction to sign a document and then scan and return it.
- You would like to scan receipts for long term storage.
- You want to scan information like auto insurance cards so that you can carry on your iPhone.
The iPhone document scanner will scan documents, forms, receipts and more and store them in the Notes app. You can use the tools of the Notes app to read, mark up, organize and print the scanned documents.
This lesson will get you started with the process to scan documents into the Notes appp.
Scan Documents
1 Lay the document you want to scan on a flat service. Good lighting and a dark service will aid the scanning process.
2 Launch the Notes app.

3 Create a new Note by tapping ![]() (Compose) icon. A new note will appear ready to accept text or in this case your scanned document.
(Compose) icon. A new note will appear ready to accept text or in this case your scanned document.
The Scanning Process

4 In the new note (or existing Note) tap the Camera icon just above the keyboard. If the Camera icon is not visible above the keyboard tap the + (Plus) to access the format bar.
5 Tap Scan Documents to begin the document scanning process.
6 Position the document on the camera screen.
7 When the scanner function is in Auto mode, once the document is centered and stable on the screen, the shutter on the camera will automatically take a picture of the document and prepare for a second page.
8 If the camera can’t frame the document or if you have changed from Auto to Manual, you can manually press the shutter button to take the shot.(See Manual Scanning below)
Multiple pages? If you are on Auto mode, the scanning process will momentarily pause allowing you to move a second page onto the surface for scanning. You can scan multiple page documents with this method. If you are in Auto mode, simply center the page and multiple page scans will accumulate into a single scanning process. You can see a count of pages next to the Save button.
9 Tap Save when you’re done and wish to end scanning.

The scanned document will be displayed in the Notes document. You can watch as the iPhone’s Live Text function will look for identifying text in the scanned document and place a title automatically on the note.
In the Notes app, you can use all of the Notes app’s tools for organizing, printing and sharing the document.
10 Optionally, if shadows are a problem on the scanned document, turning on the flash will often help eliminate shadows and add clarity to the final scans. Tap Flash and turn the flash On.
Manual Page Scanning
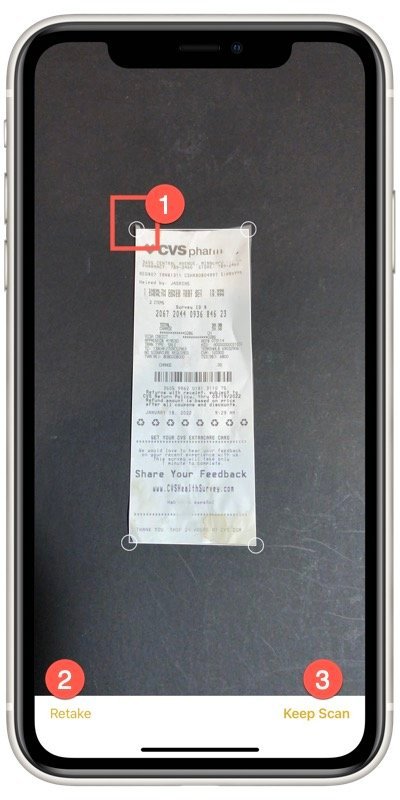
While Auto mode scanning works great, if the scanner is having difficulty detecting the edges of the page or if you want to manual control the pages with cropping, you can switch to Manual mode.
In manual mode, you will tap the Shutter icon to take the scan. You will then be given an opportunity to adjust the corners of the scanned document.
1 Move the circles at the corners to frame the document. You can adjust all four corners of the document, even cropping the scan to a specific area of the scanning surface.
2 If the scan doesn’t work for you, you can choose Retake in order to capture the scan again.
3 Press Keep Scan. The scanning process will capture the scan and then pause allowing you to scan additional pages.
When the entire document is scanned, tap Save in order to save the scan in the Notes app.

Sign or Markup the Document you Scanned
To sign or markup a document:
- Access the Note with the Scanned Document.
- Tap the scanned document in the note.
- Tap
 (Share) , then tap Markup.
 - To Markup the document, tap a pen and use your finger or stylus to draw on the document. See the lesson Write or Draw in the Notes App for more instructions.
- To add your signature, tap
 ,
, - To sign, tap
 . To manually sign your document, select a tool to use, then sign with your finger or stylus.
Additional Information
The Senior Tech Club recommends the following additional resources for members that wish to pursue additional and/or advanced information on this recipe:
iPhone User Guide – Scan text and documents in Notes using the camera on iPhone
Apple Support Document – How to scan documents on your iPhone, iPad, or iPod touch
Apple Support Document – Use Continuity Camera on your Mac Instructions on how to use the iPhone’s scanning function to scan documents directly to your Mac computer.

