Use iCloud Contact Groups to Send Group Emails
Why Group Emails?
Do you need to send emails to a collection of people on a regular basis. This might be a family group or a golf or pickleball group. The advantage of using an email group is that you can write the email to one address and the entire group will receive the email.
iCloud Contact groups will allow you to organize your contacts into group. There are two requirements for this:
Your contacts must be hosted as iPhone contacts versus Google contacts or contacts hosted in another email system.
You must be syncing your contacts to iCloud. The setup of for syncing your contacts is found in Recipe #404 How to use iCloud to expand and optimize storage.
The primary reason for the iCloud requirement is that your iPhone or iPad does not have the tools to create contact groups. So you will log onto iCloud.com and use its tools to create your groups.
We describe this process below.
Create your Contact Groups
From a laptop or desktop computer, access iCloud.com from your web browser.
Log onto iCloud using your Apple ID and Password.

If you have set up two factor authentication (recommended), you may also need to enter a code that you receive via text.
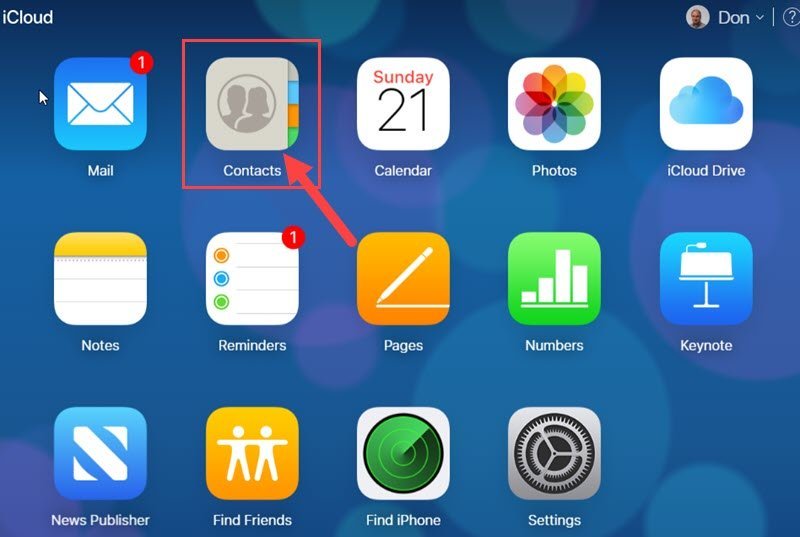
After logging in to iCloud, the collection of iCloud applications is presented. Click Contacts

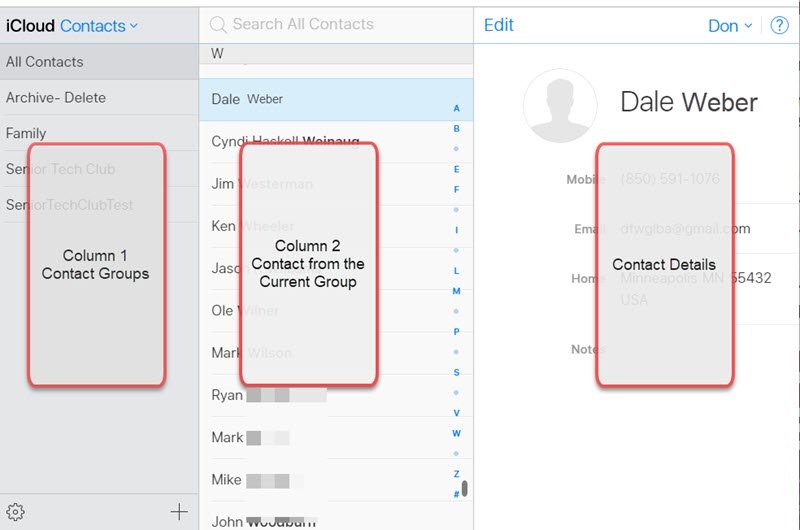
The iCloud Contacts app is opened and your Contacts are presented with three columns.

Column 1 is your Contacts Groups. All Contacts is the whole list of contacts. You new custom group will be added here.
Column 2 are the contacts in the current selected group. View the contacts of a different group by clicking on another group name in Column 1. There is a search bar at the top of this column to search for a contact or your can also browse the contact list with the letters on the right of the column.
Column 3 would be the contact details for the selected contact from Column 2. The details could include phone numbers, addresses and more. This depends on the information that you have entered.
Create a New Contact Group
For our learning, let’s say you are responsible for sending emails to your pickleball group and you wish to create your new pickleball group to be able to send a group email. The new pickleball group will appear in Column 1.
Tap on the + (plus) sign at the bottom of Column 1. Select New Group.

Type a name for the group, e.g. Pickleball Group. Press Enter/Return to finish.

Your new contact group is ready to receive new contacts. When you click on the group you will notice that there are no members in the new group.
Adding Members to a Group
You will add members to your new group by dragging contacts to the group name.
Click on All Contacts to display all of your names. Find a contact that you want to add by searching or browsing your contacts list. We are looking for Scott Anderson.

Using your mouse, click on Scott Anderson’s name and drag the name to the Pickleball Group name. Release your mouse and Scott Anderson is added to the new group.
Continue to add members to the group with a click and drag process.
After adding members to the Pickleball Group, you can confirm the action by clicking on the Pickleball Group name to display it’s members.

A contact can below to multiple groups. In our example, Scott Anderson will still be found under All Contacts and he could also become a member of the Senior Tech Club group too.
Confirming the new Group
After a few minutes, assuming that you are on WiFi, your new group will be sync to your iPhone and available for use.
You can confirm that the sync has occurred by viewing the group in the Contacts app.
Launch Contacts.
Tap Groups in the upper left.
Scroll down the Groups list until you see ICLOUD.
You will see the Pickleball Group in the group list.

Sending a Group Email
Launch the Mail app on your iPhone.
Start a new email by tapping the new email icon in the lower right corner.

In the To: line, begin to type the name of the contact group you’re trying to email. Then select Group by tapping it. You will the To:line in the email populated with the names of the group members.

