How to Scan Documents using the File app.
With IOS 13 you can use your iPhone or iPad camera to scan documents directly to a file. Previously, using the iPhone to scan a document required the scan to go direct to the Notes app and hosted in a Notes document.
In this Nugget we will show you how to can capture a scan directly to a PDF file stored either on your device, stored in iCloud or another cloud service.
This means that you have a scanner with you and ready to scan anytime or anywhere.
How will you use scanning?
Companies and organizations will scan documents in order to preserve and organize corporate records. Individuals with iPhones and iPads will get some of the same benefit. Here are some possible applications.

- You would like to capture invoices associated with some activity.
- You have old photographs that you would like to show family members without carrying the photographs.
- You read an article in the dentist’s office that you would like to read again later.
- You would like to scan documents like auto insurance cards, fishing licenses or other document to have available when needed.
- You handwritten notes in a meeting that you would like to capture and store.
Scanning using the Notes app
You can scan document using the Notes app. When you do this, the scanned image is store in the Notes app. It can be exported to a PDF file but that requires an extra step.
If you would like to review this process, refer to Nugget # N5 – Scan and Store a Document with your iPhone.
The Files App
With IOS 13, documents can be scanned using the Files app. But instead of storing scan in the Notes app, you can create files that can be stored on your device, in iCloud or cloud storage provides like Google Drive and Microsoft OneDrive. This means that you can store scanned documents on a variety of storage methods.
In this Nugget we will provide step-by-step direction to scan a document stored on your devices. Creating a folder on your device and using storage on iCloud or other platforms is beyond the scope of this Nugget.
Scan a Document in the Files App
Here are the steps to scan a document in the Files app and store it on the device.
1 Launch the Files app.

Inside the Files app
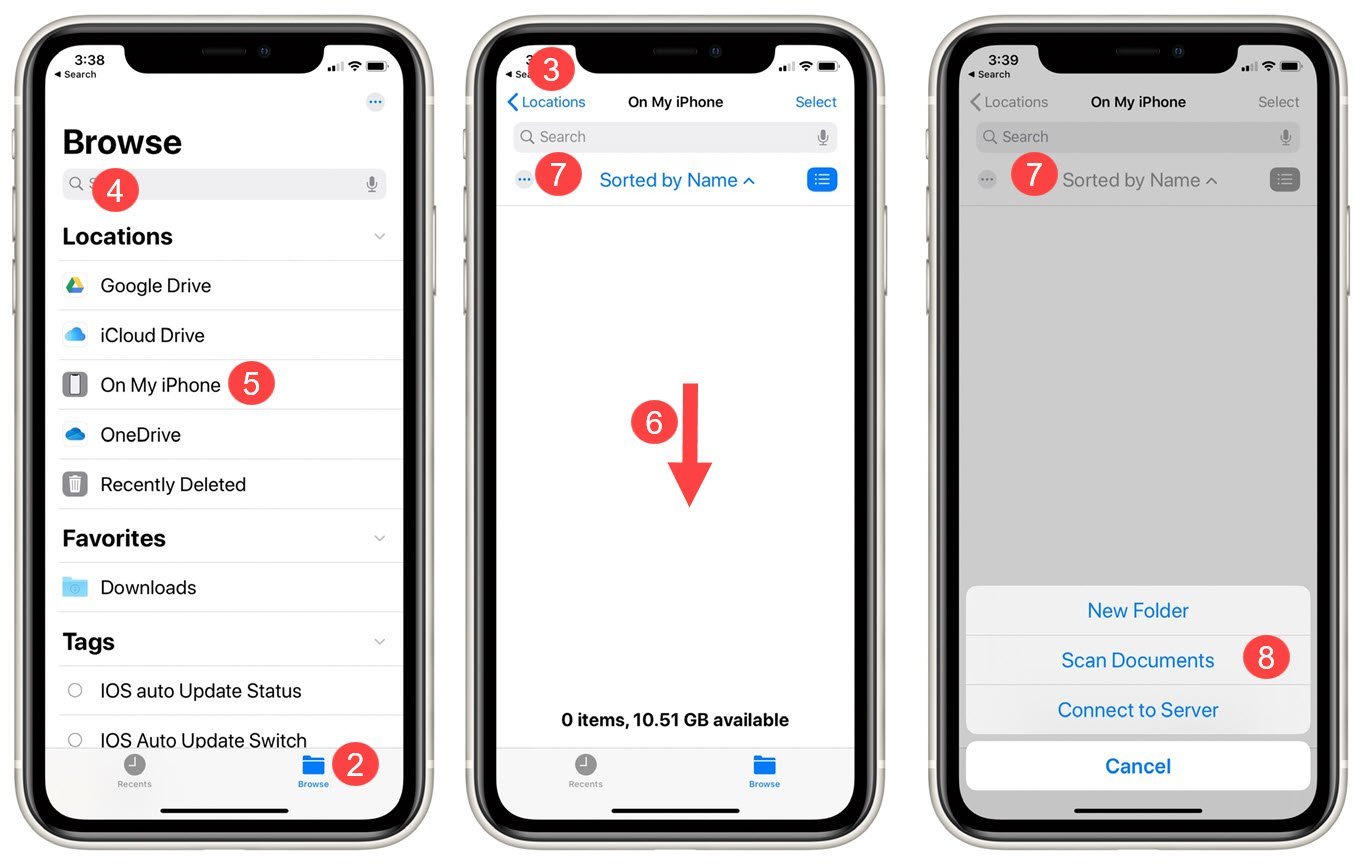
2 Tap Browse on the lower right corner of the screen. Ensure that Locations are displayed on the screen.
3 If Locations is not visible, tap the back arrow on the upper left of the screen until you see 4 Browse and a list of Locations on the screen.
The list of items that appear under locations will vary depending on apps that may be installed on your device. You will see On My iPhone and will also see iCloud Drive if you are setup up to use iCloud.
5 Tap on On My iPhone. This will be the location where you will scan a document.
6On the middle of the screen, swipe down in order to expose a 7 More menu (three dots.) Tap the three dots to display a pop-up menu at the bottom of the screen.
8 On this pop-up menu tap Scan Documents.

A viewfinder screen very similar to the Camera app appears. The viewfinder screen includes a shutter button, flash and filter icons.
9 Place the document on a flat surface and move your device so that the document appears fully in the viewfinder.
When the document is perfectly framed in the viewfinder, the scan will happen automatically.
10 If the document cannot be framed perfectly, tap the circular shutter button to take the scan.
11 When the scan happens you will be setup to support the scan of a second page. If this scan includes multiple pages, set the second page on the flat surface and frame the document in the viewfinder.
12 When you have completed scanning of the document(s), tap Save in order to finalize the scan. The Scanned Document will be displayed on the screen.
13 Tap the new Scanned Document to change the name of the document to better reflect the content of the scan. Type the new name of the document and tap Done to end the process.
How to Share, Copy or Print the Document?
With the scanned document displayed under the On My iPhone location, tap the document. The scanned document will display.
If you wish to share, move, or print the document tap Share. The Share screen will display.

The Share screen includes:
Links to Air Drop, Messages, Mail and more. These links will allow you to send the scanned document to another person.
Print – Send the Scanned PDF document an Air Print priner.
Save to Files – Save the file to another location. This could be a location on iCloud, Google Drive or Microsoft One Drive.
Tap the desired action to complete the share action.
Summary
With IOS 13, you can now embark on serious scanning of documents, notes or photos that you want to preserve, organize or just record.
Setup
No Setup necessary
Requirements
Requires IOS: 13+
Works on iPhone.
Additional Information
The Senior Tech Club recommends the following additional resources for members that wish to pursue additional and/or advanced information on this recipe:
Apple Support Doc – Use the Files app on your iPhone, iPad, or iPod touch
