A Tour of the Camera App
A great many iPhone users will use their iPhone cameras in a point and shoot fashion. They will pull out their camera, aim at their subject and press the shutter button to snap the photo.
With later iPhone models, the iPhone’s camera has included modes and features that take it into new territory. If you are only doing point and shoot, you may be missing some great photo opportunities.
The purpose of this lesson is to take you on a tour of the Camera app and identify its core capabilities that will take you beyond point and shoot.
A Tour of the Camera App
In order to take better pictures and take advantage of the primary capabilities of the iPhone came, let’s take a tour of the Camera app and it’s functions. In this tour you will find descriptions of the core screen elements that provide access to the many photography functions of the iPhone.
1 Shutter – Tap the shutter button to take a photo. This is the standard action for capturing a photo. There are other ways to press the shutter including using the Volume buttons on the side of your iPhone. More details at: Sevens Ways to Release the Camera Shutter.
2 Hidden Drawer (HD) – As functions have been added to your iPhone’s camera app, an additional (and somewhat hidden) drawer of controls have been added to the phone. Tap the arrow at the top of the Camera screen to access the controls. Tap the arrow again to hide the drawer. More details are provided below.
3 Modes – Are you taking a photo, video or other type of photo? Swipe left or right anywhere on the screen to switch between modes. Tip: The modes will disappear when the Hidden Drawer (HD) are displayed.
4 Selfie – Switch between the back and front (selfie) lens but tapping on the Selfie icon.
5 Flash (On/Off) – The flash indicator at the upper left will indicate if flash is on or off and allow you basic on/off control of the flash when tapped. Use the HD flash controls to switch between flash modes for more control of the flash.

6 Live Photos (On/Off) – A live photo combines photo and 3 seconds of video for a unique live-motion photo. Use this Live Photos icon for basic on/off function. A slash will appear through the icon when off.
7 Optical Zoom – iPhones with multiple lens for optical zoom will display multiple numbers. The numbers will vary between iPhone models. Tap the desired number, for example .5 or 2x to select that lens for your photo or video.
8 Last Photo – Tap the Last Photo icon to quickly access the last photo taken in the Photos app. You can return to the Camera app by tapping the back arrow on the upper left corner of the Photos app display.
9 Focus & Exposure – The Focus point and Exposure of your iPhone camera is automatically managed by your iPhone. It generally does a good job. However you can manually set the focus and exposure by simply tapping on the spot on the screen that you wish to have the focus. For example, if you subject includes items in the foreground and background, tap the area of the screen that you consider to be your primary focus.
When you tap, you will get a slider on the screen (look for the sun) that allows you to change the exposure bias. You will see the image get lighter or darker.
AE/AF Lock – When you press and hold on the subject on the screen, you will lock the exposure and focus. This is particularly useful if you want to take multiple photos with the same exposure and focus. When locked, you will see an AE/AF (automatic exposure/automatic focus) Lock on the screen.

Press and Hold to get AE/AF Lock.
Tap another location on the screen to remove the lock.
The Hidden Drawer Controls
Tap the Hidden Drawer arrow at the top of the camera screen in order to access the controls you find on the hidden drawer. Our tour continues with a description of these additional camera controls.
The controls found in the Hidden Drawer will vary depending on the iPhone you have. Top of the line iPhones will have more controls that take advantage of enhanced features.

1 Flash
If picture needs flash, the iPhone’s built in flash can add necessary light to a subject. Manage the Flash by pressing the Flash (lightning bolt) icon in the camera app.
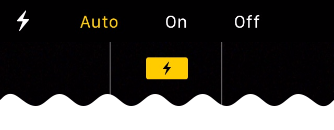
Control the Flash
The Flash function provides three settings:
- Auto – the Camera app will use the flash when warranted by light conditions.
- On – the Camera app will always use flash
- Off – the Camera app will not use flash. I recommend that you leave the flash off and turn it on only when required.
 Senior Smart Tip: Flash not always needed
Those of us who learned about cameras in the Kodak era, recognize a rule that says that indoor pictures always required a flash. The iPhone camera is actually good in low light situations and the rule doesn’t always need to apply. In general, your photos are better without flash. Try the photo before you turn on the flash.
2 Night Mode – If your iPhone provides Night Mode, you will find a night mode indicator with a seconds indicator on the upper left corner of the camera screen when you take a photo in a low-light situation.

Night mode helps you capture more detail and brighten your shots in low-light situations by increasing the length of the exposure or how long the lens is open to capture your photo. The length of the exposure in Night mode is determined automatically. However, you can experiment with the manual settings found in the hidden drawer control. Use the slider to choose between the Auto and Max timers. With Auto, the time is determined automatically; Max uses the longest exposure time. The setting you choose is saved for your next Night mode shot.
Use a tripod for Night mode.
You need to hold your iPhone steady for Night mode photos. Your lens could be open for up to 10 seconds for a Night mode shot. This is a perfect place to use a tripod of other stabilizer for your photo.
3 Live Photo- You learned above that you will find a Live Photo on/off switch in the upper left of the camera screen. There is also a control in HD that includes an Auto selection. Auto option that lets the phone decide whether a shot has enough action either side of it to warrant taking a Live Photo. I recommend leaving Live photos Off turning it on when you want to capture a unique shot.
Your iPhone can “remember” your desired/previous setting for Live photo with an option in the Settings app. See: Turn Off Live Photos
4 Photographic Style – Advanced iPhones can take photos using different photographic styles. The default is a true-to-life standard style. Preview different styles by swiping left-right on the shot. The options include:
- Rich Contrast: Darker shadows, richer colors, and stronger contrast create a dramatic look.
- Vibrant: Wonderfully bright and vivid colors create a brilliant yet natural look.
- Warm: Golden undertones create a warmer look.
- Cool: Blue undertones create a cooler look.
5 Aspect Ration – The default aspect ratio for your photos is 4:3. This is the ration between horizontal and vertical. On iPhone 11 and later, then tap 4:3 to choose between square, 4:3, or 16:9 aspect ratios. Square is a popular format for social media platforms like Instagram. 16:9 is standard for video.
6 Exposure – Above you learned that you can control the focus and exposure of your shot by tapping on the view finder. You will find a more detailed exposure setting in the hidden drawer. Use the slider to change the amount of light used in the photo with exposure.
7 Timer – Use a timer release to take family photos where you use a tripod or prop your iPhone to take a picture allowing you a few seconds to move into the photo.
- Select either 3s or 10s for the amount of delay. You will see a Timer indicator at the top of the camera screen.
- Tap the Shutter with the shutter or volume button. You have have either 3 or 10 seconds to move into position.
- After a countdown and clicking, a burst shot of ten pictures will be taken in either 3 or 10 seconds.
- The selected timer setting will be used for subsequent photos. Turn the timer off when finished with this function.
8 Filters
Add a filter to add a special effect to a picture. A prime example is the mono filter which will take the picture as a black and white image. You can also add filters after the photo is taken in the Photos app. This may be easier so that while your photo scene is “live,” you don’t have to make a filter decision immediately.

The default “natural” filter is Original when you are finished.
Exploring Camera Modes
Your iPhone Camera has several photo modes, allowing you to shoot still, video, panoramic or more. The modes available on your iPhone can vary based on the model of phone.
Here are definitions and essential tips for each mode:
- Photo – Use to take traditional still photos.
- Portrait – Available on iPhone 7 Plus, 8 Plus and later models to achieve a depth of field effect for portraits, e.g. clear face, blurry background.
- Pano(ramic) – Use Pano to capture a wide angle photo that won’t fit on a single camera screen.
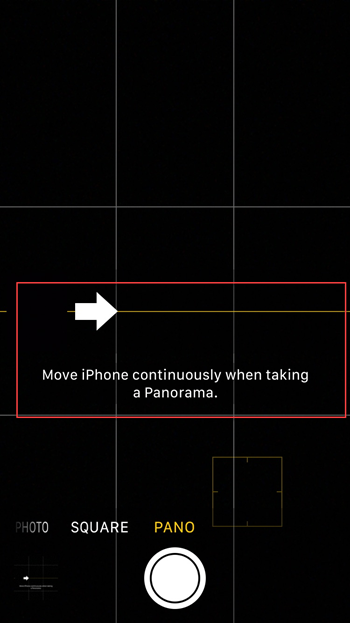
On screen instruction to Pano Mode
Pano Instruction: Tap shutter, Move camera in the direction of the arrow. Tap shutter to end.

Pano Sample – Boston Harbor taken by Don
- Video – Shoot high quality movies with your iPhone.
Video Instruction: Tap the shutter to start recording. Tap again to end the video. Note how the shutter button is red for video.
- Time-lapse – Create time lapse video of activities or events where you want to record progress.
Time-lapse Instruction: Tap the shutter to start and end. Prop your phone in stationary position or use a tripod.
- Slo-mo Take video that you play back in slow motion. Great for special effects or capturing a fast activity.
- Cinematic – Cinematic mode applies a depth-of-field effect that keeps the subject of your video sharp while creating a beautifully blurred foreground and background. iPhone automatically identifies the subject of the video and keeps it in focus throughout the recording; if a new subject is identified, iPhone automatically transitions the point of focus.
Step-by-Step
Additional Information
The Senior Tech Club recommends the following additional resources for members that wish to pursue additional and/or advanced information on this recipe:
iPhone User Guide – Photos App
Senior Tech Club Lessons Mentioned:
Title